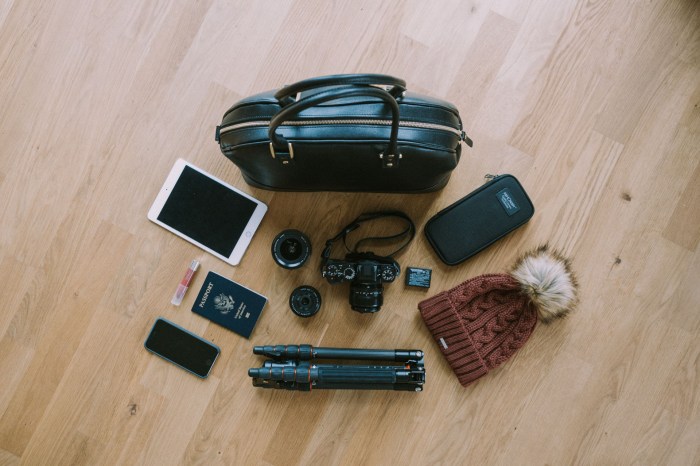
Embarking on a photographic journey with minimal baggage requires careful consideration of your equipment. This guide delves into the essential gear for minimalist travel photographers, focusing on maximizing image quality while minimizing weight and bulk. We’ll explore camera bodies, lenses, accessories, and techniques that allow you to capture stunning images regardless of your destination’s challenges.
From choosing the right camera and lenses to mastering efficient packing strategies and leveraging mobile editing tools, we’ll provide practical advice and insights to help you create unforgettable travel memories without the burden of excessive gear. This guide emphasizes a balance between functionality and portability, ensuring your photography experience is both rewarding and stress-free.
Essential Camera Gear
Choosing the right gear for minimalist travel photography requires careful consideration of weight, versatility, and image quality. The goal is to pack light without sacrificing the ability to capture stunning images in diverse environments. This section Artikels essential camera bodies, lenses, and bags to help you achieve this balance.
Essential Camera Bodies
Selecting a camera body depends heavily on your individual needs and travel style. Here are three options, each with its own strengths and weaknesses:
| Camera Model | Pros | Cons | Best Travel Style |
|---|---|---|---|
| Sony a7C | Compact and lightweight full-frame sensor, excellent image quality, versatile lens selection. | Relatively expensive, battery life could be better for extensive shooting. | Adventure travel, city exploration, landscape photography. |
| Fujifilm X-T30 II | Lightweight, excellent image quality, retro design, user-friendly interface, affordable. | Smaller sensor compared to full-frame, limited video capabilities compared to higher-end models. | Street photography, casual travel, portraiture. |
| Canon EOS R10 | Excellent autofocus, high burst shooting speed, lightweight, good video capabilities. | Cropped sensor, less low-light performance compared to full-frame cameras. | Wildlife photography (if paired with a suitable telephoto lens), action shots, sports. |
Versatile Lenses
A small selection of versatile lenses is key to minimalist travel photography. These lenses cover a range of focal lengths and apertures, allowing you to adapt to various shooting situations.
Five versatile lenses that minimize the need for carrying multiple lenses include:
- Wide-angle zoom lens (e.g., 16-35mm): Ideal for landscapes, architecture, and street photography, capturing expansive scenes with minimal distortion.
- Standard zoom lens (e.g., 24-70mm): A versatile all-rounder suitable for portraits, landscapes, and street photography, offering a good balance between wide and telephoto perspectives.
- Telephoto zoom lens (e.g., 70-200mm): Excellent for wildlife, sports, and capturing distant subjects, allowing you to get closer without physically approaching them.
- Prime lens (e.g., 35mm or 50mm): Known for their sharp image quality and compact size, perfect for street photography, portraits, and low-light situations. They encourage a more deliberate approach to composition.
- Ultra-wide lens (e.g., 14mm): Exceptional for astrophotography and capturing dramatic landscapes, emphasizing perspective and scale. Requires careful planning of composition due to its extremely wide field of view.
Lightweight and Durable Camera Bags
The right camera bag is crucial for protecting your gear while keeping your load manageable. Consider these options:
| Bag Name | Features | Capacity | Suitability |
|---|---|---|---|
| Peak Design Everyday Sling | Weatherproof, comfortable straps, multiple compartments, quick access. | Fits a camera body, 2-3 lenses, and accessories. | Short trips, city exploration, day hikes. |
| Think Tank Retrospective 7 | Discreet design, protective padding, classic style. | Fits a camera body, 2-3 lenses, and accessories. | Trips of varying lengths, blends in well in crowded areas. |
| WANDRD PRVKE 21 | Versatile design, comfortable carrying system, multiple compartments, expandable. | Fits a camera body, 3-4 lenses, accessories, and personal items. | Longer trips, adventures requiring more gear, adaptable to different climates. |
Essential Accessories
Beyond the camera and lenses, several compact yet crucial accessories significantly enhance the minimalist travel photographer’s experience. These additions improve image quality, workflow efficiency, and overall convenience, without adding excessive bulk to your travel bag. Careful selection ensures you capture stunning images while maintaining a light and manageable kit.
Choosing the right accessories is key to a successful minimalist travel photography setup. Overpacking can be as detrimental as underpacking; therefore, a strategic selection of high-quality, versatile items is essential. The following accessories represent a balance between functionality and portability.
Five Essential Travel Photography Accessories
The following list details five essential accessories, beyond camera body and lenses, that are vital for a minimalist travel photography approach. Each item has been chosen for its portability and impact on image quality and workflow.
- High-quality cleaning kit: A microfiber cloth and a blower brush are essential for maintaining lens cleanliness. Dust and smudges can drastically affect image quality, especially in challenging environments. A small, compact cleaning kit takes up minimal space and is invaluable for keeping your equipment in pristine condition.
- Portable power bank: Long days of shooting can quickly drain your camera and phone batteries. A portable power bank ensures you can continue capturing moments throughout your journey, avoiding the frustration of a dead battery at a crucial moment. Consider a power bank with multiple USB ports for charging multiple devices simultaneously.
- Small, versatile tripod: A lightweight, travel-sized tripod provides stability for low-light shots and long exposures, enhancing image sharpness. It’s particularly useful for self-portraits and time-lapses, adding creative possibilities to your photography. Look for tripods made of carbon fiber for maximum strength and minimum weight.
- External hard drive or cloud storage subscription: Backing up your photos is crucial. A portable external hard drive offers immediate backup, protecting your work from loss or damage. Alternatively, a cloud storage subscription provides secure off-site backup, accessible from anywhere. Consider both for redundancy.
- Neutral density (ND) filter: ND filters reduce the amount of light entering the lens, allowing you to use wider apertures or slower shutter speeds in bright conditions. This is especially useful for creating dreamy, motion-blurred effects in daylight, adding a creative dimension to your images.
Portable Photo Printer for Immediate Image Sharing
A portable photo printer offers an immediate and tangible way to share your travel photography. Imagine instantly gifting prints to new friends you meet or creating personalized keepsakes for yourself. Many compact printers use dye-sublimation or thermal printing technology, producing high-quality, smudge-proof prints. These printers often connect wirelessly via Bluetooth or Wi-Fi, making them easy to use with smartphones and tablets.
They typically come with rechargeable batteries and offer various print sizes, often including postcard or sticker formats. This instant gratification fosters connection and transforms the travel experience, making it more memorable.
Essential Accessories Packing List
This packing list prioritizes weight and space efficiency, ensuring you carry only the essentials for minimalist travel photography.
- Microfiber cleaning cloth
- Blower brush
- Portable power bank (20,000mAh or higher)
- Compact tripod (carbon fiber preferred)
- 2 x High-capacity SD cards (64GB or higher)
- External hard drive (or cloud storage access details)
- Small, lightweight ND filter (e.g., 10-stop)
- Portable photo printer (consider size and weight carefully)
Travel Photography Techniques for Minimalists

Minimizing your gear doesn’t mean minimizing your creative potential. With a thoughtful approach to composition, lighting, and post-processing, you can create stunning travel photographs even with a limited kit. This section explores techniques that leverage the environment and your creativity to compensate for a lack of extensive equipment.Mastering a few key techniques can significantly elevate your travel photography. By understanding how to use natural light effectively, employing strong compositional elements, and utilizing efficient editing workflows, you can achieve professional-looking results with minimal gear.
This section details specific methods for achieving this.
Creative Composition and Lighting Techniques
Effective composition and lighting are crucial for impactful images, especially when working with limited equipment. Instead of relying on advanced gear to achieve specific effects, focus on harnessing the natural elements around you. For instance, the golden hour, the period shortly after sunrise or before sunset, offers soft, warm light that’s incredibly flattering for portraits and landscapes. Utilizing leading lines, such as roads or rivers, can draw the viewer’s eye into the scene and create depth.
Similarly, the rule of thirds, a compositional guideline suggesting placing key elements off-center, can significantly improve the visual balance and interest of your photos. Consider using silhouettes against a brightly lit background for a dramatic effect. This technique works well during sunrise or sunset when the contrast between the subject and the background is stark. A simple example would be a lone tree silhouetted against a fiery sunset sky.
Mobile versus Desktop Photo Editing
Editing photos on the go versus using desktop software presents a trade-off between convenience and processing power. Mobile apps offer portability and ease of use, allowing for quick edits and sharing. However, they often lack the advanced features and control found in desktop software like Adobe Lightroom or Photoshop. Mobile apps are generally limited in their ability to handle large RAW files, often requiring smaller JPEGs for efficient processing.
Desktop software, on the other hand, offers greater precision and control, especially when dealing with RAW files which contain significantly more image data. However, this comes at the cost of portability and potentially longer processing times. The choice depends on your workflow and priorities. For instance, if quick social media sharing is important, mobile editing might suffice.
If you prioritize high-quality image editing and post-processing, desktop software remains the better option.
Managing and Backing Up Photos While Traveling
Efficient photo management and backup are crucial to avoid data loss while traveling. Losing irreplaceable memories is a significant risk, so implementing a robust strategy is vital.
- Regular Cloud Backups: Utilize cloud storage services like Google Photos, Dropbox, or iCloud to automatically back up your photos throughout your trip. This ensures redundancy in case of device loss or damage. Consider adjusting the image quality settings to balance storage space with image quality.
- Offline Backup: Carry an external hard drive or a second memory card as an offline backup. This provides an additional layer of security, especially in areas with unreliable internet connectivity. Regularly transfer your photos to the external drive or second card.
- Selective Deletion: Regularly review your photos and delete unwanted or blurry images to free up space on your devices and prevent your backup from becoming unwieldy. This is especially helpful when using devices with limited storage.
Travel Hacks for Photographers
Traveling as a photographer often involves juggling gear, deadlines, and budget constraints. Efficient planning and smart strategies can significantly enhance your travel experience, allowing you to focus on capturing stunning images rather than wrestling with logistical hurdles. This section Artikels practical travel hacks to optimize your photography trips.
Time and Money Saving Travel Hacks
Efficient packing and transportation of photographic equipment are crucial for a smooth and cost-effective trip. Overpacking leads to increased baggage fees and cumbersome travel. The following tips aim to streamline your travel process.
- Invest in a quality camera backpack: A well-designed backpack with dedicated compartments for your camera, lenses, and accessories will protect your gear and keep it organized. Look for backpacks with comfortable straps and a waist belt to distribute weight evenly.
- Utilize packing cubes: Packing cubes compress clothing and other items, maximizing space in your luggage. This allows you to fit more clothing and accessories while keeping everything neatly organized.
- Carry-on your essential gear: Keep your most valuable and frequently used equipment (camera body, primary lens, batteries, memory cards) in your carry-on bag to avoid potential loss or damage during checked baggage handling.
- Utilize travel-sized toiletries and accessories: Minimize the bulk and weight of your toiletries by using travel-sized containers. This saves space and reduces the risk of spills during transit.
- Explore budget-friendly accommodation options: Consider staying in hostels, guesthouses, or Airbnb rentals instead of luxury hotels. This can free up funds for other aspects of your trip, such as photography workshops or equipment upgrades.
Strategies for Finding Unique Photography Locations
Discovering compelling photographic locations in unfamiliar cities requires a proactive approach. The following strategies will help you uncover hidden gems and avoid the typical tourist traps.
- Explore local neighborhoods: Venture beyond the main tourist areas to discover authentic local life and hidden architectural marvels. Often, the most captivating images are found in less-visited areas.
- Utilize online resources: Explore online photography communities, blogs, and social media platforms for inspiration and insider tips on lesser-known locations. Look for photographers who have shot in the same city and see where they found their subjects.
- Engage with locals: Ask locals for recommendations on hidden gems or unique places that are not typically featured in tourist guides. Their insights can lead you to unexpected photographic opportunities.
Photography Trip Checklist
Thorough preparation is essential for a successful photography trip. Overlooking crucial details can lead to unexpected complications and frustration. The following checklist ensures you’re well-prepared.
- Visa requirements: Research and obtain any necessary visas well in advance of your trip. Visa application processes can take considerable time.
- Travel insurance: Secure comprehensive travel insurance that covers medical emergencies, lost or stolen equipment, and trip cancellations. The cost of replacing expensive equipment is significant, and insurance will help offset that cost.
- Vaccinations and health precautions: Consult your doctor regarding necessary vaccinations and health precautions for your destination. This is especially important for travel to regions with different health risks.
- Gear checklist: Create a detailed list of all your photographic equipment, ensuring you have all necessary accessories, batteries, and memory cards.
- Flight and accommodation bookings: Confirm your flight and accommodation bookings well in advance, especially during peak season. Booking in advance often leads to better pricing.
- Currency exchange: Exchange currency before your trip to avoid unfavorable exchange rates at the airport or tourist destinations. Consider using a credit card with low foreign transaction fees.
- Local laws and customs: Research local laws and customs related to photography, especially regarding permissions for shooting in certain locations or photographing people. Respecting local customs is crucial.
Travel Insurance and Visa Considerations
Protecting your investment and ensuring a smooth trip requires careful consideration of both travel insurance and visa requirements. For photographers, this is especially critical due to the value of their equipment and the potential complexities of international travel with professional gear. Failing to plan adequately in these areas can lead to significant financial and logistical setbacks.Comprehensive travel insurance is paramount for photographers.
It acts as a safety net against unforeseen circumstances, providing financial protection for various eventualities that could severely impact a photography trip. This goes beyond basic travel insurance; it needs to specifically cover the value of your photography equipment, including cameras, lenses, and accessories, against loss, theft, or damage. Such coverage is crucial given the often high cost of professional photographic equipment.
Travel Insurance for Photographers: Essential Coverage
Securing suitable travel insurance involves understanding the specific coverage options available. It’s advisable to find a policy that explicitly mentions coverage for photographic equipment, outlining the limits and conditions of that coverage. Look for policies that cover accidental damage, theft, and loss, specifying the valuation process for your equipment. Ideally, the policy should allow for the replacement or repair of your equipment at its current market value, rather than depreciated value.
Furthermore, consider liability coverage. This protects you against potential claims if your actions cause damage to someone else’s property or result in personal injury during your photography activities. For instance, a policy might cover legal fees and compensation if an accident occurs involving your equipment. Obtaining quotes from multiple providers and comparing coverage details is essential to ensure you have adequate protection tailored to your specific needs and the value of your gear.
Visa Considerations for Photographers
Applying for travel visas, especially when carrying professional photography equipment, necessitates careful attention to detail. Three key aspects warrant particular consideration. Firstly, clearly state the purpose of your trip, highlighting your intention to conduct professional photography work. This may involve providing a portfolio, client contracts, or letters of invitation from organizations or clients. Secondly, ensure you accurately declare all your photography equipment when filling out visa applications.
Failure to do so could result in delays, confiscation of equipment, or even denial of entry. Providing a detailed inventory with serial numbers is often recommended. Finally, be aware of any import/export regulations concerning photography equipment in your destination country. Some countries have strict rules regarding the import of professional equipment, requiring permits or special documentation. Failing to comply with these regulations can lead to significant fines or legal repercussions.
Thorough research into the specific visa requirements and import regulations of your destination country is essential before your departure.
Exploring Urban Escapes and Vacation Packages
Urban exploration offers a rich tapestry of photographic opportunities, from the vibrant energy of street life to the imposing grandeur of architectural marvels. Choosing the right destination and travel style significantly impacts the quality and efficiency of your photography trip. This section explores popular urban destinations, contrasts pre-packaged tours with independent travel, and provides a sample itinerary for a focused photography expedition.
Popular Urban Destinations for Photography
Selecting the right city is crucial for a successful urban photography trip. Consider factors like architectural styles, street life vibrancy, and the ease of navigation when making your choice. Three cities consistently rank highly for their diverse photographic offerings.
- New York City, USA: NYC offers an unparalleled blend of architectural styles, from the iconic Art Deco skyscrapers of Midtown to the brownstones of Brooklyn. The city’s constant energy provides countless street photography opportunities, with diverse subjects and ever-changing scenes. The sheer scale of the city allows for exploration of various neighborhoods, each with a unique photographic identity. Imagine capturing the bustling energy of Times Square at night, contrasted with the quiet serenity of Central Park at dawn.
- Kyoto, Japan: Kyoto presents a stark contrast to NYC’s modern dynamism. Its ancient temples, traditional wooden houses, and meticulously manicured gardens offer a wealth of architectural and landscape photography opportunities. The city’s serene atmosphere and the unique interplay of light and shadow create visually stunning scenes. Picture capturing the delicate details of a bamboo forest or the vibrant colors of a traditional tea house during golden hour.
- Buenos Aires, Argentina: Buenos Aires boasts a captivating blend of European elegance and South American vibrancy. Its wide boulevards, colorful buildings, and passionate street life provide a unique photographic experience. The city’s architectural styles range from grand European-inspired structures to more modern designs, offering a rich variety of subjects. Envision capturing the tango dancers in Plaza de Mayo at sunset or the lively street art in the La Boca neighborhood.
Pre-packaged Tours versus Independent Travel
The choice between a pre-packaged tour and independent travel significantly influences a photographer’s experience. Pre-packaged tours offer convenience and structure, often including transportation, accommodation, and guided excursions. However, they can limit spontaneity and flexibility, crucial elements for capturing unexpected photographic moments. Independent travel, while requiring more planning, provides greater freedom to explore at your own pace and pursue photographic opportunities as they arise.
| Feature | Pre-packaged Tour | Independent Travel |
|---|---|---|
| Cost | Generally higher upfront cost | Potentially lower cost with careful planning |
| Flexibility | Less flexibility, pre-determined itinerary | High flexibility, control over schedule |
| Spontaneity | Limited opportunities for spontaneous shots | Greater opportunities for capturing unexpected moments |
| Planning | Minimal planning required | Requires significant pre-trip planning |
Sample Five-Day Urban Photography Itinerary (New York City)
This itinerary focuses on maximizing photographic opportunities in New York City, emphasizing efficient time management and strategic shooting times.
Day 1: Arrive in NYC, check into accommodation. Afternoon: Explore Times Square (late afternoon for soft light) and the surrounding area. Evening: Capture the city lights from a rooftop bar (night photography).
Day 2: Morning: Photograph the Brooklyn Bridge (sunrise for dramatic lighting). Afternoon: Explore DUMBO and Brooklyn Heights for unique perspectives of the Manhattan skyline. Evening: Street photography in Greenwich Village (golden hour).
Day 3: Morning: Visit Central Park (early morning for fewer crowds and soft light). Afternoon: Explore the architectural marvels of Midtown Manhattan (midday for strong shadows). Evening: Capture the atmosphere of a local neighborhood like the East Village.
Day 4: Morning: Visit the High Line (sunrise or early morning for fewer crowds). Afternoon: Explore Chelsea Market and the surrounding art galleries. Evening: Capture the vibrant nightlife in a chosen neighborhood.
Day 5: Morning: Final photography session in a favorite location. Afternoon: Depart from NYC.
Venture Capital and Photography (Optional – Broader Context)
The intersection of venture capital and photography might seem unconventional, but increasingly, innovative photography projects and startups are attracting significant investment. This reflects a growing recognition of the potential for photographic technology and creative applications to generate substantial returns. Venture capital can play a vital role in fostering growth within this sector, providing the necessary financial resources to scale operations, develop new technologies, and reach wider audiences.Venture capital funding can significantly benefit photography projects by providing the capital needed for expansion and innovation.
This funding allows photographers and entrepreneurs to develop cutting-edge photographic technologies, explore new artistic mediums, and build robust business models around their creative endeavors. Access to capital can be particularly crucial for projects that require substantial investment in equipment, software, marketing, and personnel. Furthermore, venture capitalists often bring valuable expertise and mentorship, guiding the project’s strategic direction and helping navigate the complexities of business development.
Securing Venture Capital Funding for Photography Projects
Securing venture capital funding requires a well-defined business plan and a compelling pitch. Photographers seeking investment need to demonstrate a clear understanding of their target market, a scalable business model, and a strong team capable of executing their vision. This typically involves creating a comprehensive business plan outlining the project’s financial projections, market analysis, and competitive landscape. A strong pitch deck is essential, concisely presenting the key aspects of the project and highlighting its potential for significant returns.
Networking with venture capitalists and attending industry events can also increase the likelihood of securing funding. Successfully demonstrating a unique value proposition, strong market potential, and a capable team are key factors in attracting investment. For example, a startup developing AI-powered photo editing software might attract funding by showcasing its superior efficiency and user-friendly interface, compared to existing solutions.
Another example could be a photographer with a proven track record and a unique artistic style seeking funding to expand their studio and launch a series of high-profile exhibitions. The ability to clearly articulate the financial projections and demonstrate a clear path to profitability is paramount in securing investment.
Ultimately, minimalist travel photography is about capturing the essence of your journey with intention and efficiency. By carefully curating your gear, mastering essential techniques, and embracing a streamlined approach, you can free yourself from the constraints of excess baggage and focus on what truly matters: the art of capturing compelling images. Remember, the best camera is the one you have with you, and with careful planning and a minimalist mindset, you can create stunning travel photographs regardless of your equipment’s limitations.
Detailed FAQs
What’s the best way to protect my camera gear during travel?
Use a well-padded camera bag and consider additional protective cases for individual items. Invest in a quality rain cover for unexpected weather.
How can I avoid losing photos while traveling?
Regularly back up your photos to cloud storage or a portable hard drive. Carry multiple memory cards and consider using a card reader for quick offloading.
What are some good resources for finding unique photography locations?
Utilize online photography communities, local blogs, and social media platforms like Instagram to discover hidden gems and less-visited spots.
Are there any specific considerations for international travel with photography equipment?
Check customs regulations for your destination country, especially regarding battery restrictions and import duties on equipment. Always carry a copy of your equipment’s purchase receipts.